![]()
![]()
This document briefly describes the features of the Pmw megawidget
toolkit and how to use the megawidgets. Using examples, it
describes those features common to all Pmw megawidgets. For a
description of individual Pmw megawidgets see the
reference manuals.
For complete information on general Pmw megawidget functionality see the
Pmw.MegaArchetype reference manual.
For a lot more example code, run any of the files in the
Pmw demos directory.
A simple example of a megawidget is a counter. This widget contains an entry field and two small arrow buttons. Users may enter a value directly into the entry field or they may use the buttons to increment and decrement the value displayed without having to use the keyboard. Having this and other megawidgets in your toolbox allows you to choose the best graphical interface for your application.
To run the examples in the tutorial, make sure that the
Pmw lib directory is in sys.path. You
should be able to cut and paste the examples into an interactive
python session, or you can copy them to a file and run the file with
python.
The following two lines should be entered before any of the
examples. These import and initialise Pmw.
For more information on Pmw.initialise() see the
Pmw functions reference manual.
import Pmw
root = Pmw.initialise()
If necessary, you can have more control over how Tkinter and Pmw are initialised by using this form of initialisation:
import Tkinter
root = Tkinter.Tk()
import Pmw
Pmw.initialise(root)
Now that you have the formalities out of the way, you can create and pack a counter megawidget (see Pmw.Counter reference manual) using its default configuration like this:
counter1 = Pmw.Counter()
counter1.pack(padx = 10, pady = 10)
Now enter a number and click on the arrow buttons to see the number increment or decrement. The result looks something like this:
![]()
The above example creates the counter as a child of the root window. If you want to create it as a child of another window (for example, a Tkinter.Frame widget called 'frame'), add the parent as an argument to the constructor:
counter1a = Pmw.Counter(frame)
Once a megawidget has been created, you can call any of its other methods in a similar way to Tk widgets. The following sets the value of the counter and then increments it:
counter1.setentry(41)
counter1.increment()
Like any widget, a megawidget may have options to allow it to be configured for a particular use. Options allow the megawidget user to modify the appearance and behaviour of the megawidget. The counter megawidget has several such options. One of them, datatype, specifies how the counter should count up and down, such as, for example, by integers, reals, times or dates. The default value is 'numeric', which means the counter expects integers to be entered and will support incrementing and decrementing by whole numbers.
Another option is
increment, which specifies how many units should be
added or subtracted when the counter is incremented or decremented.
Using these options, you can create a time counter, supporting the
format HH:MM:SS, and counting in minutes, like
this (note also the call to the setentry method to set
the contents of the entry field):
counter2 = Pmw.Counter(
    datatype = 'time',
    increment = 60)
counter2.setentry('00:00:00')
counter2.pack(padx = 10, pady = 10)
Many megawidget options can be modified using the
configure() method. For example, you can change the
value of the increment option to 10 minutes like
this:
counter2.configure(increment = 60 * 10)
Some megawidget options can only be set when creating the megawidget.
These options can not be set by calling the configure()
method, but they can be queried in all the usual ways. For example,
the counter has an orient initialisation option
which specifies whether the arrow buttons should appear to the
left and right of the entry field ('horizontal')
or above and below ('vertical'). You can create a
numeric counter with arrow buttons above and below the entry
field like this:
counter3 = Pmw.Counter(orient = 'vertical')
counter3.pack(padx = 10, pady = 10)
You can query the value of megawidget options (initialisation or not) in similar ways as for normal Tkinter widgets. For example, the following code prints the values of some of the counter options.
print counter3.cget('increment')
    --> 1
print counter3.configure('orient')
    --> ('orient', 'orient', 'Orient', 'horizontal', 'vertical')
When a Tk widget option is queried, its value is always
returned as a string, regardless of the type used when setting the
option. However, when a Pmw megawidget option is queried, a
reference to the object used when setting the option is returned.
In other words it is not always a string. For example, the type
returned by cget('increment') above was integer.
Megawidgets are made up of other widgets, which we call
components. Each component is known by a logical name and
may be either a simple Tk widget, or may itself be a megawidget.
Pmw gives the megawidget user access to not only the functionality
supported directly by the megawidget through its options and methods,
but also to the components of the megawidget and their options and
methods. To access a component directly, use the
component() method. For example, to call method
doit of component comp
of megawidget mega:
mega.component('comp').doit()
There is a short-hand way to access the options of components, by using the notation component_option. This allows, for example, a counter megawidget to be configured with different colored backgrounds for each of its arrow button components (these components are called downarrow and uparrow):
counter2.configure(
    downarrow_background = 'green',
    uparrow_background = 'red')
All megawidgets are enclosed in a containing widget which is created automatically by the Pmw base classes. For normal megawidgets the container is a Tkinter Frame widget. For megawidgets which are toplevel windows, the container is a Tkinter Toplevel widget. The containing widget is accessible as the hull component.
To access options of the containing widget use the form hull_option. For example to create a counter megawidget with a wide sunken border around it:
counter4 = Pmw.Counter(
    hull_relief = 'sunken',
    hull_borderwidth = 5
)
Some megawidgets, such as Dialog and LabeledWidget, also have a
frame into which users can pack other widgets. This frame may be a
component but can also be accessed with the interior()
method. For the Pmw.MegaToplevel and Pmw.MegaWidget classes, the
interior widget is the same as the hull widget. For other
megawidgets, the hull is the outer, containing widget and the
interior is the empty frame which can be used to extend the
megawidget by including extra internal widgets.
Components may themselves be megawidgets and so their (sub-)components can be referred to using the notation component_sub-component. For example, the entryfield component of the counter is a Pmw.EntryField megawidget (which handles the input validation). In turn, this has a Tkinter.Entry component named entry. Therefore, you can change the background of the counter's Tkinter.Entry widget with:
counter2.configure(entryfield_entry_background = 'yellow')
Most component path names (like entryfield_entry) have a shorter alias defined for them. In this case, you can use the equivalent:
counter2.configure(entry_background = 'yellow')
Each megawidget component is an instance of some python class. The default class of each component is given in the reference manual. By using the special pyclass component option, you can specify a different python class to use when creating the component. For example, to create a Pmw.Counter megawidget which has a Tkinter.Button as its label, rather than the default Tkinter.Label:
counter5 = Pmw.Counter(
        labelpos = 'w',
        label_text = 'Hello',
        label_pyclass = Tkinter.Button
)
Since a Pmw megawidget is a normal python class, it both inherits methods from its base classes and also may have other methods defined for it in the usual way. Pmw also supports a third way that a megawidget may gain methods - by 'forwarding' methods to one or more of its subwidgets. This is also known as 'delegating'. For example, a Pmw.Counter megawidget delegates the methods related to its Pmw.EntryField component, entryfield, to the component. It does not have to explicitely define methods which call the component methods. This is why we can call counter2.setentry() - since setentry() is a method of the Pmw.EntryField component, it is available to the Pmw.Counter.
Methods already defined by a class or its base classes take precedence over delegated methods. For example, Pmw.Counter inherits a cget method from Pmw.MegaArchetype. Therefore, this method is not delegated to the cget method of Pmw.EntryField.
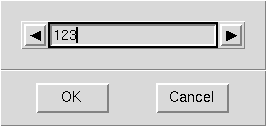
There are several ways of extending Pmw megawidgets. Firstly, the flexibility of the options and components allows the widget's appearance and behaviour to be greatly modified. Secondly, widgets of the user's choice can be added inside some megawidgets by using the interior() method. The Pmw classes MegaToplevel, MegaWidget, Dialog and LabeledWidget are particularly designed to be extended in this way. For example, to create a dialog window containing a counter:
dialog = Pmw.Dialog(
        title = 'Counter dialog',
        buttons = ('OK', 'Cancel'))
interior = dialog.interior()
counter = Pmw.Counter(interior)
counter.pack(padx = 20, pady = 20)
A third way to extend megawidgets is to subclass them. See How to build Pmw megawidgets for more information.
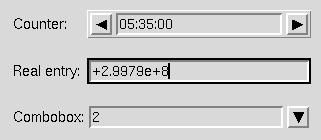
The following code is a small example of how to use Pmw megawidgets. It is a complete program which displays three ways for the user to enter a value - using an up-down counter, an entry field with validation and a dropdown combobox.
import Pmw
root = Pmw.initialise(fontScheme = 'pmw1')

counter = Pmw.Counter(
        label_text = 'Counter:',
        labelpos = 'w',
        entryfield_value = '00:00:00',
        entryfield_validate = 'time',
        datatype='time',
        increment=5*60,
)
counter.pack(fill = 'x', padx = 10, pady = 10)

entry = Pmw.EntryField(
        label_text = 'Real entry:',
        labelpos = 'w',
        value = '+2.9979e+8',
        validate = 'real',
)
entry.pack(fill = 'x', padx = 10, pady = 10)

combo = Pmw.ComboBox(
        label_text = 'ComboBox:',
        labelpos = 'w',
        scrolledlist_items = map(str, range(20))
)
combo.pack(fill = 'x', padx = 10, pady = 10)

# Make the labels line up neatly
Pmw.alignlabels((counter, entry, combo))

root.title('Pmw megawidgets example')
root.mainloop()
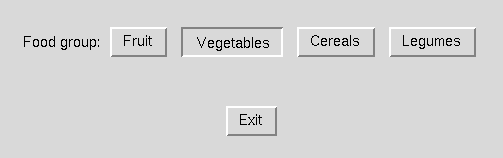
The following also shows how to use Pmw megawidgets. It displays a RadioSelect megawidget and an exit button packed into the root window.
import Tkinter
import Pmw

def callback(tag):
    # This is called whenever the user clicks on a
    # button in the RadioSelect widget.
    print tag, 'was pressed.'

# Initialise Tkinter and Pmw.
root = Pmw.initialise(fontScheme = 'pmw1')
root.title('Pmw RadioSelect demonstration')

# Create and pack a RadioSelect widget.
radio = Pmw.RadioSelect(
        command = callback,
        labelpos = 'w',
        label_text = 'Food group:')
radio.pack(padx = 20, pady = 20)

# Add some buttons to the RadioSelect.
for text in ('Fruit', 'Vegetables', 'Cereals', 'Legumes'):
    radio.add(text)
radio.invoke('Vegetables')

# Create an exit button.
exit = Tkinter.Button(text = 'Exit', command = root.destroy)
exit.pack(pady = 20)

# Let's go.
root.mainloop()
There are several ways to use the Tk option database to customise a Pmw application. Firstly you can customise all the basic Tk widgets in the usual way. For example, to set the background of all Tkinter.Label widgets (whether a megawidget component or not):
root.option_add('*Label.background', 'pink')
To set the background of all Pmw.EntryField label components:
root.option_add('*EntryField.Label.background', 'green')
To set the background of all Pmw.EntryField components, including the hull component:
root.option_add('*EntryField*background', 'blue')
The above option settings affect basic Tk widgets and, since it is
built into the Tk widgets, this functionality is always available.
However, to be able to use the Tk option database to set the default
values for Pmw megawidget options, Pmw.initialise()
must be called with useTkOptionDb = 1. If this is not
done, Pmw does not query the Tk option database for megawidget
option defaults. This is the default behaviour because there is a
slight performance penalty for using the Tk option database.
Assuming useTkOptionDb has been set, the default
buttonbox position of all Pmw.Dialog megawidgets can be changed
with:
root.option_add('*Dialog.buttonboxpos', 'e')
To set the label position of all Pmw.EntryField megawidgets, thus giving them a label component by default:
root.option_add('*EntryField.labelpos', 'w')
![]()
Home. Pmw 0.8.5 Maintainer gregm@iname.com. 9 Feb 2001